How to get Metadata from ProppFrexx into Rocket Broadcaster
Introduction
ProppFrexx OnAir is flexible radio automation software that is gaining popularity amongst terrestrial and internet radio broadcasters. Rocket Broadcaster can be run alongside ProppFrexx or on another PC as streaming encoder.
In this guide, you'll learn how to configure ProppFrexx to send track metadata to Rocket Broadcaster, so your stream can have accurate "Now Playing" metadata for your listeners.
Prerequisites
Before you begin, ensure you have the following:
For this guide, ProppFrexx OnAir and Rocket Broadcaster can be installed either on the same PC or on separate PCs.
Step 1 - Enable TCP Metadata in Rocket Broadcaster
First, we need to configure a couple of settings inside Rocket Broadcaster before it can receive metadata from ProppFrexx.
In the Rocket Broadcaster window:
- Click Broadcast in the top menu, and select Metadata Capture.
- Click the TCP Server tab.
- Check "Allow other applications to update your metadata over TCP".
- Ensure the port is set to 9002.
- If ProppFrexx is running on a different PC, change Allow TCP connections from to Remote computers (via any NIC)
- Beside Format, select Rocket Broadcaster XML.
- Beside Character Encoding, select UTF-8.
- Click OK to save your changes.
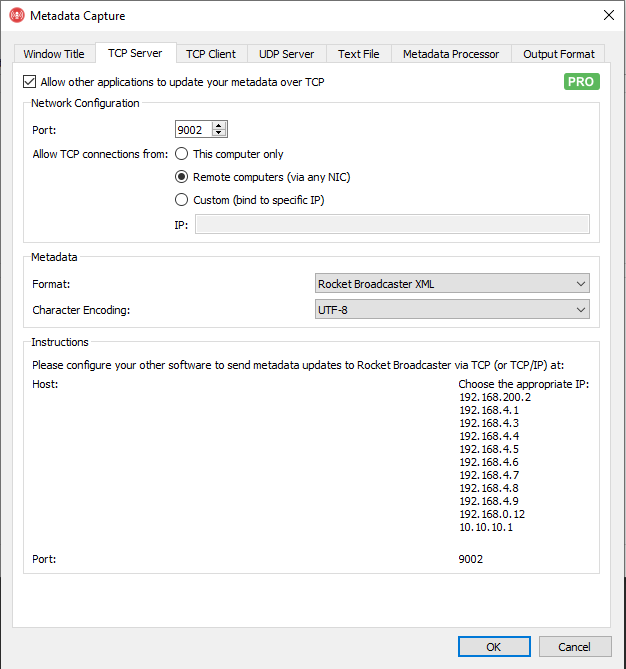
Rocket Broadcaster is now configured to let other applications update your stream metadata. In the next step, you'll configure ProppFrexx to connect to Rocket and send those metadata updates.
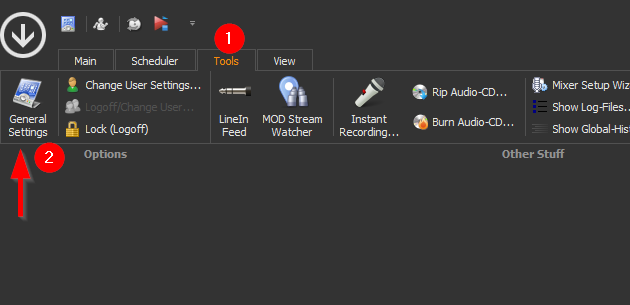
Step 2 - Configure ProppFrexx to send metadata over TCP
-
Inside ProppFrexx, click Tools in the menu at the top, then General Settings.
-
In the "Settings and Options" window, click Event/Commands on the left, then expand Playlist. Click OnTrackPlay and click the little Edit button.
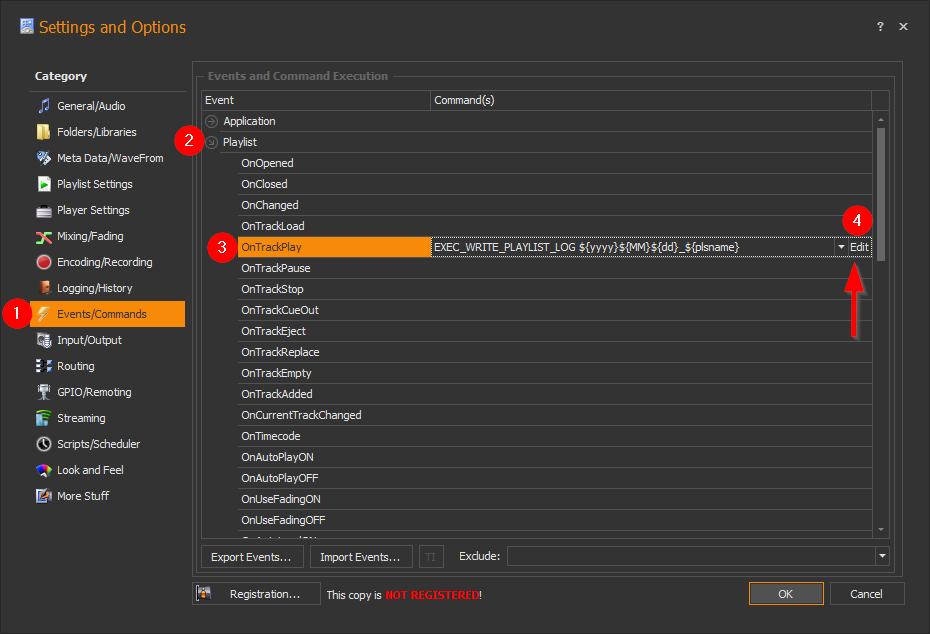
-
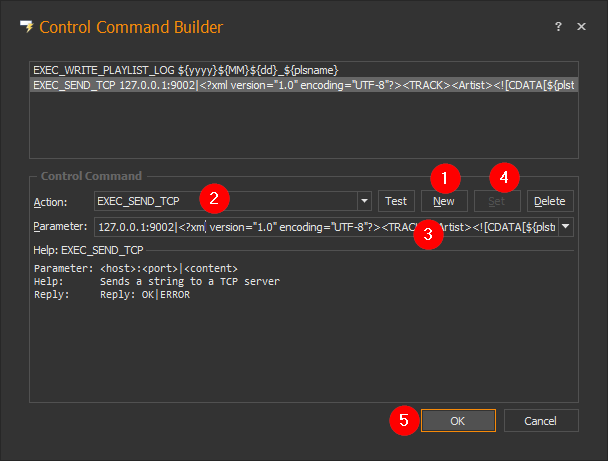
Next, this is the important part. In the "Control Command Builder" window that appears, we need to set up a new action that sends metadata to Rocket Broadcaster over TCP. First, click the New button, then choose the "EXEC_SEND_TCP" action. In the Parameter field, paste this exactly with no line breaks:
127.0.0.1:9002|<?xml version="1.0" encoding="UTF-8"?><TRACK><Artist><![CDATA[${plstrackartistcurrent}]]></Artist><Album><![CDATA[${plstrackalbumcurrent}]]></Album><Title><![CDATA[${plstracktitlecurrent}]]></Title><Year><![CDATA[${plstrackyearcurrent}]]></Year><Label><![CDATA[${publisher}]]></Label><ISRC><![CDATA[${plstrackisrccurrent}]]></ISRC><Duration><![CDATA[${plstotalsec}]]></Duration><Category><![CDATA[${plstracktypecurrent}]]></Category><ISRC><![CDATA[${plstrackisrccurrent}]]></ISRC><ArtBase64><![CDATA[${plstrackalbumartcurrent}]]></ArtBase64></TRACK>After you paste that, click the Set button, then OK to save your changes.
If you are running Rocket Broadcaster on a different PC than ProppFrexx, then change
127.0.0.1in the above string to the IP address of the PC that is running Rocket Broadcaster.If you're having trouble getting these settings to persist, try following the numbered red labels in the screenshot below:
Step 3 - Test it
ProppFrexx OnAir should start sending metadata to Rocket Broadcaster as soon as the next track begins. In the Rocket Broadcaster window, the metadata shown under Now Playing will update as soon as metadata is received, and is immediately inserted into your online streams. If you see it update, it's working successfully and your configuration is complete.
Troubleshooting
- If you don't see the metadata update in Rocket Broadcaster, double check that all your settings match this guide.
- Check the Rocket Broadcaster log file for clues. (Help->View Log...)
- Verify that you have entered the "EXEC_SEND_TCP" action parameter as a single line, exactly as it appears in Step 2 above.