Basic Setup
This page will introduce the basics of streaming audio and cover what you need to know to get up and running.
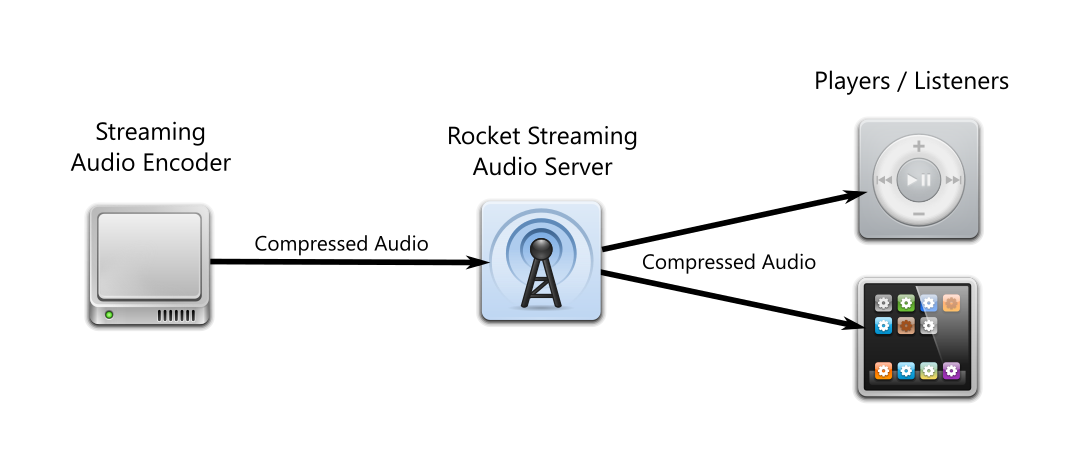
To serve live streaming audio across the internet, you need a streaming audio encoder, a streaming audio server, and a player. The streaming audio encoder captures live audio, creates a compressed audio stream out of it, and uploads it in realtime to a streaming audio server. The streaming audio server receives this live compressed audio and sends it to any listeners that connect to it. It continuously "broadcasts" the audio from the encoder to your listeners. Listeners connect and tune in to a stream using a streaming audio player, which includes a wide variety of software and hardware, including web browsers, smart speakers, and mobile phones.
Rocket Streaming Audio Server can host multiple streams (or "mounts"), to serve audio from multiple radio stations, or in different formats or quality levels. Each stream is identified by it's "mount" or "mountpoint", which corresponds to the listening URL for the stream.
For example, if a mount is configured with the name /example, a listener could play this
stream by visiting http://your_server_hostname:8000/example.
A Basic Configuration
Before you can start RSAS, you need to create a configuration file. The configuration format is identical to Icecast's, to make migration from Icecast as easy as possible. (Some lesser-used options from Icecast are not implemented - See the Icecast migration guide for more information.)
Here is a basic configuration file for RSAS, with a single /example mount:
<icecast>
    <hostname>localhost</hostname> <!-- Change this to the public hostname of your server -->
    <listen-socket>
        <port>8000</port>
        <bind-address>0.0.0.0</bind-address> <!-- Listen on all network interfaces -->
    </listen-socket>

    <mount>
        <mount-name>/example</mount-name>
        <username>source</username>
        <password>hackme</password> <!-- Change this password -->
    </mount>
</icecast>
Create a file named simple.xml and copy the above snippet to it. You can
then go ahead and run rsas with our config file, using the following command:
$ ./rsas -c simple.xml
If you don't see any errors, then RSAS is up and running.
The next step is to connect to the /example mount with a streaming
audio encoder.
We recommend our own encoder, Rocket Broadcaster, as it's easy to use, has powerful features, and has industry-leading reliability. The Free Edition has enough features to get you started, so no purchase is necessary. However, you can use any Icecast-compatible encoder.
You'll need to configure the streaming audio encoder of your choice with the following stream settings:
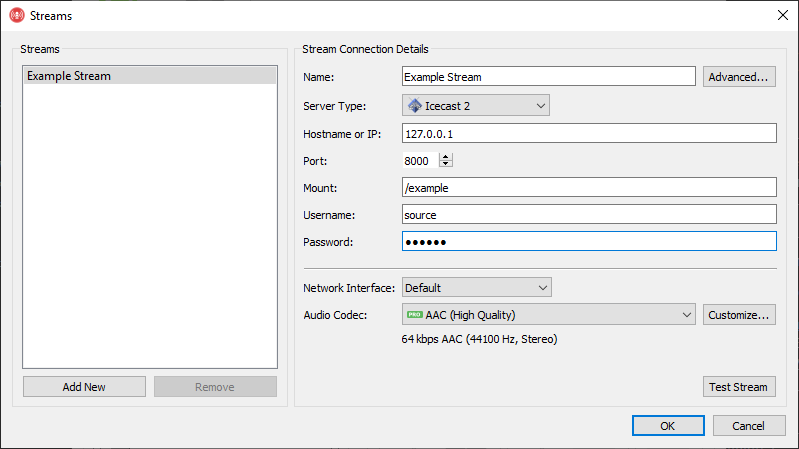
Server Type / Protocol: Icecast2
Server hostname/IP:     127.0.0.1
Port:                   8000
Username:               source
Password:               <use your password from the config>
Mount:                  /example
You can choose any supported audio codec and bitrate. We generally recommend MP3 or AAC.
To configure Rocket Broadcaster to connect to the example stream, click Broadcast -> Streams..., and enter the information as in the screenshot:
After you've completed the encoder configuration, you should be able to start your broadcast.
You can listen to your broadcast by visiting http://127.0.0.1/example in your web browser or
loading it in your favourite media player (such as VLC). You can also see some statistics
about your stream by visiting http://127.0.0.1/health.
In the next section, we'll discuss mounts in more details.